Quick Start Guide
Introduction
The Shirtplatform API is a REST service for browsing the product and motive catalog, managing shop resources, and submitting orders for print-on-demand fulfillment.
Environments
| Environment | Base URL | Purpose |
|---|---|---|
| Pilot | https://pilot.shirtplatform.com/webservices/rest/ |
Integration testing — use this environment to develop and test your integration before going live. |
| Production | https://api.shirtplatform.com/webservices/rest/ |
Live environment — real orders, real fulfillment. |
Authentication
Private resources are secured with the HTTP Basic Auth mechanism. Use your account login and password to obtain a session token.
curl -i --user userLogin:userPassword https://api.shirtplatform.com/webservices/rest/authIf the credentials are correct, the server responds with 200 OK and returns a session token in the x-auth-token response header:
HTTP/1.1 200 OK
x-auth-token: f81d4fae-7dec-11d0-a765-00a0c91e6bf6
Set-Cookie: SESSION=f81d4fae-7dec-11d0-a765-00a0c91e6bf6; Path=/context-root; Secure; HttpOnly
Save the token — include it as the x-auth-token header in every subsequent request. If the credentials are incorrect, the server returns 401 Unauthorized.
HTTP Session
The API supports two mechanisms for maintaining a session. The authentication response provides both — choose whichever suits your client:
| Mechanism | Request header to send |
|---|---|
| Token header | x-auth-token: <token> |
| Cookie | Cookie: SESSION=<token> |
GET /webservices/rest/accounts/15/shops HTTP/1.1
Host: api.shirtplatform.com
x-auth-token: f81d4fae-7dec-11d0-a765-00a0c91e6bf6GET /webservices/rest/accounts/15/shops HTTP/1.1
Host: api.shirtplatform.com
Cookie: SESSION=f81d4fae-7dec-11d0-a765-00a0c91e6bf6To log out, send a DELETE to the Authentication resource. The server will invalidate the session and clear both the token and the cookie.
Media Type
The API supports both XML and JSON. Set the appropriate request headers to choose a format:
| Format | Content-Type | Accept |
|---|---|---|
| XML | application/xml |
application/xml |
| JSON | application/json |
application/json |
JSON format notes
The API uses Jettison Mapped Convention for JSON serialization, which differs from standard Jackson JSON:
- XML attributes become
@fieldNamekeys (e.g.@rel,@href) - The top-level object is wrapped in a root key (
wrapRootValue=true) - Single-element arrays may be serialized as a plain object instead of
[...]
Error Responses
All error responses use a consistent JSON or XML envelope with two fields:
{
  "exception": {
    "message": "Shop not found",
    "internalErrorMessage": "Shop with ID 999 does not exist"
  }
}<exception>
<message>Shop not found</message>
<internalErrorMessage>
Shop with ID 999 does not exist
</internalErrorMessage>
</exception>| Field | Description |
|---|---|
message |
Human-readable summary of the error. |
internalErrorMessage |
Additional detail — root cause, constraint name, or validation message. May be absent on some errors. |
HTTP status codes
| Status | When |
|---|---|
400 Bad Request |
Request data failed validation (missing required field, invalid value). |
401 Unauthorized |
No valid session token provided or the session has expired. |
403 Forbidden |
Authenticated but not authorized to access this resource. |
404 Not Found |
The requested resource does not exist or does not belong to your account. |
405 Method Not Allowed |
HTTP method not supported on this endpoint. |
409 Conflict |
Request conflicts with current state — duplicate entry, constraint violation, or invalid state transition. |
500 Internal Server Error |
Unexpected server-side error. Contact support if this persists. |
Linking & Resource Expansion
Why use linking
The API embeds fully qualified URLs for related resources using Atom links. This aids discoverability — new resources can be consumed by following embedded links without changes to client code. If an endpoint URL changes, the new URL is returned automatically.
Pagination is a practical example. Instead of constructing next-page URLs manually, clients follow the next link embedded in the response:
<pagedData xmlns:atom="http://www.w3.org/2005/Atom">
  <shop>
    <id>223</id>
    <name>Love</name>
    <atom:link rel="self" href="https://api.shirtplatform.com/webservices/rest/accounts/16/shops/223"/>
    <atom:link rel="logoPreview" href="https://api.shirtplatform.com/webservices/rest/public/shops/223/logo"/>
  </shop>
  <shop>
    <id>224</id>
    <name>JGA</name>
    <atom:link rel="self" href="https://api.shirtplatform.com/webservices/rest/accounts/16/shops/224"/>
  </shop>
  <atom:link rel="next" href="https://api.shirtplatform.com/webservices/rest/accounts/16/shops?page=1&size=2" type="application/xml"/>
  <totalElements>46</totalElements>
</pagedData>
Links in JSON
In JSON (Jettison format), Atom link attributes appear with the @ prefix:
{
  "pagedData": {
    "shop": [
      {
        "id": 223,
        "name": "Love",
        "atom.link": [
          { "@rel": "self", "@href": "https://api.shirtplatform.com/webservices/rest/accounts/16/shops/223" },
          { "@rel": "logoPreview", "@href": "https://api.shirtplatform.com/webservices/rest/public/shops/223/logo" }
        ]
      }
    ],
    "atom.link": {
      "@rel": "next",
      "@href": "https://api.shirtplatform.com/webservices/rest/accounts/16/shops?page=1&size=2"
    },
    "totalElements": 46
  }
}
Link rel values
The following rel values appear across the API:
| rel | Description |
|---|---|
| Navigation | |
self | Canonical URL of this resource. |
next | Next page in a paginated collection. |
expanded | Expanded variant of this resource (full object tree). |
| Account collections | |
shops | Shops belonging to the account. |
countries | Countries available on the account. |
shippingModules | Shipping modules configured on the account. |
| Shop collections | |
products | Products available in the shop. |
orders | Orders placed in the shop. |
userMotives | User-uploaded motives in the shop. |
webhooks | Webhook subscriptions for the shop. |
orderCsvImports | CSV order import jobs for the shop. |
| Order relations | |
orderedProducts | Ordered products within an order. |
| Product relations | |
productsExpanded | Expanded product list. |
assignedColors | Colors assigned to a product. |
assignedSizes | Sizes assigned to a product. |
assignedViews | Views (sides/areas) assigned to a product. |
| Motive relations | |
motives | Motives associated with the resource. |
localizations | Localized content for the resource. |
tags | Tags assigned to a motive. |
technologies | Print technologies for a motive. |
| Media | |
image | Source image of the resource. |
preview | Preview image of the resource. |
| Shop configuration | |
properties | Configuration properties of a shop. |
providers | Providers for a shipping module. |
configCreator | Creator configuration for a shop. |
Pagination parameters
All collection endpoints that return pagedData support the following query parameters:
| Parameter | Default | Description |
|---|---|---|
page |
0 |
Zero-based page index. First page is 0. |
size |
10 |
Number of items per page. |
The response includes totalElements (total number of items across all pages) and atom:link rel="next" / rel="prev" links for navigating between pages. Use the links instead of constructing URLs manually.
Resource expansion
Some resources have an expanded variant that returns related objects inline, reducing the number of API calls. Use the expanded endpoint when you know you will need the additional data.
GET /webservices/rest/accounts/15/shops/86/products/41782          → basic info + links
GET /webservices/rest/accounts/15/shops/86/products/expanded/41782 → full object tree
The basic response includes Atom links to related collections (assignedSizes, assignedColors, assignedViews, etc.). The expanded response embeds those collections inline.
Make an Order (Deferred)
The deferred order is the recommended way to place an order. In a single POST to orders/usingCreatorSE you submit the whole order — customer, shipping, and every item — as one CreatorSE.OrderDeferred payload. The platform validates it, stores it in one transaction, and hands it to the asynchronous order-preparing pipeline; the response carries the new order id.
Why the deferred order is preferred
- One atomic call. The order header, customer, address, shipping and all items are persisted in a single transaction — it either all lands or none of it does. The incremental approach creates a bare order and then makes a separate call per item, which can fail partway and leave a half-built order to reconcile.
- No HTTP-session coupling. The whole order travels in the request body, so nothing depends on a session-bound order or on threading an
orderIdthrough a build-then-commit sequence. - Any mix of item types in one payload. Custom designs, ready-made templates, and passthrough warehouse items ride together in three separate collections (
designs,templates,passthroughItems). - Asynchronous processing. The endpoint returns
200as soon as the payload is validated and persisted; design rendering and order composition run out of band, so your request does not block on that pipeline. - No manual finalization. Once the order-preparing pipeline has processed the submission, the order is automatically committed and placed into production — you do not call
commitOrderorsendToProduction. (The incremental path requires both of those calls by hand after adding items.)
Prerequisites
- Account and Shop (obtain
accountIdandshopIdvia the Auth and Shop resources) - Country — obtain via the Country resource (contains currency and VAT settings); it is required on the order
- For each design item: a
productIdand itsassignedColor.id/assignedSize.idfrom the Product resource, plus anymotive.idplaced on it
Submit the order
Make a single POST request. This example carries all three item collections — a custom design whose composition shows all three element types (a motive with a dynamic layer, a DDF production file, and a decoration), a template, and a passthrough item:
POST /webservices/rest/accounts/15/shops/86/orders/usingCreatorSE HTTP/1.1
Accept: application/json
Content-Type: application/json
x-auth-token: c4094ac8-fbae-4d67-ab71-7ff0714b7647

{
  "creatorse_productionOrderDeferred": {
    "uniqueId": "ext-order-777",
    "financialStatus": "PAID",
    "customer": {
      "firstName": "John",
      "lastName": "Doe",
      "email": "john.doe@emailservice.com",
      "phone": "+44208269323",
      "billingAddress": {
        "street": "Golborne Road",
        "streetNo": "45",
        "city": "London",
        "zip": "WC2N 5DU",
        "countryCode": "UK"
      },
      "shippingAddress": {
        "street": "Golborne Road",
        "streetNo": "45",
        "city": "London",
        "zip": "WC2N 5DU",
        "countryCode": "UK"
      }
    },
    "country": {"id": 27, "code": "UK"},
    "orderShipping": {
      "title": "Standard shipping",
      "carrier": {"id": 418}
    },
    "designs": {
      "creatorse_design": [{
        "productId": 41559,
        "amount": 10,
        "assignedColor": {"id": 227227},
        "assignedSize": {"id": 133414},
        "sku": "TSHIRT-BLK-M",
        "compositions": {
          "creatorse_composition": [{
            "productArea": {"id": 88},
            "elements": [
              {
                "creatorse_designElementMotive": {
                  "motive": {"id": 12345},
                  "position": {"left": 10, "right": 10, "top": 10, "bottom": 10},
                  "layers": {
                    "creatorse_designElementLayer": [
                      {"name": "name-line", "text": "John", "rgbColor": "#FF0000"}
                    ]
                  }
                }
              },
              {
                "creatorse_designElementDdf": {
                  "previewResource": {"url": "https://cdn.example.com/preview/back.png"},
                  "productionResource": {"url": "https://cdn.example.com/print/back.pdf", "filename": "back.pdf"},
                  "position": {"left": 15, "right": 15, "top": 20, "bottom": 20}
                }
              },
              {
                "creatorse_designElementDecoration": {
                  "sku": "STICKER-WOVEN-001",
                  "placement": "chest-left"
                }
              }
            ]
          }]
        }
      }]
    },
    "templates": {
      "creatorse_designedTemplateProduct": [{
        "templateProductId": 90210,
        "amount": 2,
        "assignedColor": {"id": 227228},
        "assignedSize": {"id": 133415}
      }]
    },
    "passthroughItems": {
      "creatorse_passthroughItem": [{
        "sku": "SUP-MUG-78432",
        "name": "Ceramic mug 330 ml",
        "quantity": 2,
        "brand": "MugWorld",
        "color": "white",
        "referenceId": "PO-2026-001"
      }]
    }
  }
}
On success the endpoint returns 200 with a CreatorSE.OrderSubmited carrying the generated order id (and your uniqueId). A malformed envelope — a missing country or customer address, or a DesignElementDdf whose productionResource.filename has no file extension — is rejected with a real 400. An unknown or foreign accountId / shopId is 401.
What goes in each collection
| Collection | Item type | Use for |
|---|---|---|
designs | CreatorSE.Design | Custom designs assembled from compositions and elements — and plain base products (a design with a productId and variant but empty compositions). |
templates | CreatorSE.DesignedTemplateProduct | Ready-made, designer-prepared template products, referenced by templateProductId (or templateProductSku). |
passthroughItems | CreatorSE.PassthroughItem | Simple warehouse products that pass through production untouched (no printing/decoration). Max 100 per order; never supplier-validated even when validateSuppliers is true. |
Design element types
Each composition inside a design holds an elements array. The array is heterogeneous — every entry names its concrete element type as its key:
- DesignElementMotive — places a motive (artwork/image) referenced by
idfrom the library, or supplied inline viaurl/attachment. Its optional layers replace text or colour on named SVG layers of the motive. - DesignElementDdf — a production-ready design file: a
previewResourceand aproductionResource(whosefilenamemust include an extension). - DesignElementDecoration — a decoration (sticker/label) named by its
skuand optionalplacement.
For how to build a design — product areas, positioning motives, and previewing before ordering — see Design with CreatorSE and the machine-readable workflow-create-design.md. The design object is identical to the one used per item in the incremental flow.
Further reading
- workflow-manage-orders.md — the full order lifecycle, the deferred create envelope, and how it compares to the incremental path.
- workflow-add-ordered-product.md — every way to add an item (deferred vs. per-item endpoints).
- workflow-create-design.md — building, previewing, and ordering a single design.
- How to Make an Order — the alternative, incremental order-building flow.
How to Make an Order
Prerequisites
- Account and Shop (obtain
accountIdandshopIdvia the Auth and Shop resources) - Product — choose from the catalog via the Product resource
- Country — obtain via the Country resource (contains currency and VAT settings)
Step 1 — Create the order
Make a POST request to the Order resource with the customer and shipping details:
POST /webservices/rest/accounts/15/shops/86/orders HTTP/1.1
Accept: application/json
Content-Type: application/json
x-auth-token: c4094ac8-fbae-4d67-ab71-7ff0714b7647

{
  "productionOrder": {
    "country": {"id": 27},
    "orderShipping": {
      "title": "Shipping title",
      "carrier": {"id": 418}
    },
    "customer": {
      "firstName": "John",
      "lastName": "Doe",
      "email": "john.doe@emailservice.com",
      "phone": "+44208269323",
      "billingAddress": {
        "street": "Golborne Road",
        "streetNo": "45",
        "city": "London",
        "zip": "WC2N 5DU",
        "countryCode": "UK"
      },
      "shippingAddress": {
        "street": "Golborne Road",
        "streetNo": "45",
        "city": "London",
        "zip": "WC2N 5DU",
        "countryCode": "UK"
      }
    }
  }
}
Step 2 — Add an ordered product
Using the id from the created order, add a product with a design using the CreatorSE endpoint:
POST /webservices/rest/accounts/15/shops/86/orders/177/orderedProducts/usingCreatorSE HTTP/1.1
Accept: application/json
Content-Type: application/json
x-auth-token: c4094ac8-fbae-4d67-ab71-7ff0714b7647

{
  "creatorse_design": {
    "productId": 41559,
    "amount": 10,
    "assignedColor": {"id": 227227},
    "assignedSize": {"id": 133414},
    "compositions": {
      "creatorse_composition": [{
        "productArea": {
          "assignedView": {
            "view": {"position": "FRONT"}
          }
        },
        "elements": {
          "creatorse_element": [{
            "motive": {"id": 12345}
          }]
        }
      }]
    }
  }
}
This path is not auto-finalized. Unlike the deferred order — which the pipeline commits and sends to production for you — an incrementally built order stays a draft until you finalize it yourself with the two calls below.
Step 3 — Commit the order
Once every item has been added, commit the order with a PUT commitOrder request to the Order resource. This stamps the order's financial status (financialStatus query param, default PENDING); it does not yet start production. Returns 204.
PUT /webservices/rest/accounts/15/shops/86/orders/177/commitOrder?financialStatus=PAID HTTP/1.1
x-auth-token: c4094ac8-fbae-4d67-ab71-7ff0714b7647
Step 4 — Send the order to production
Finally, hand the committed order to the production and fulfilment pipeline with a PUT sendToProduction request. No body is needed — the hand-off is derived from data already on the order. Returns 204.
PUT /webservices/rest/accounts/15/shops/86/orders/177/sendToProduction HTTP/1.1
x-auth-token: c4094ac8-fbae-4d67-ab71-7ff0714b7647
Order Statuses
Orders have two independent status fields: financialStatus (payment) and fulfilmentStatus (production/shipping). Both appear on the ProductionOrder object returned by the Order resource.
Financial status
Tracks the payment lifecycle of an order.
| Value | Description | Notes |
|---|---|---|
PENDING | Payment not yet confirmed | Initial state on order creation |
AUTHORIZED | Payment authorized but not yet captured | |
PARTIALLY_PAID | Partial payment received | |
PAID | Full payment confirmed | Triggers the production pipeline |
PARTIALLY_REFUNDED | Partial refund issued | |
REFUNDED | Full refund issued | |
VOIDED | Transaction voided |
Note: transitions are forward-only — once an order reaches PAID it cannot return to PENDING.
Fulfilment status
Tracks the production and shipping lifecycle of an order.
| Value | Description | Notes |
|---|---|---|
WAITING_FOR_RESOURCES | Processing high-quality motive files | Set automatically after PAID |
PREPARED_TO_PRODUCE | All resources ready, awaiting production pickup | |
NOT_EDITABLE | Order picked up by production — locked for editing | |
FINISHED | Order shipped | Irreversible. Triggers orders/fulfilled webhook |
RECLAMATION | Reclamation request received | |
CANCELLATION_WAITING | Cancellation requested, awaiting confirmation | |
CANCELLED | Order cancelled | Irreversible. Triggers orders/cancelled webhook |
ERROR_HQ_MOTIVES | Failed to process high-quality motive files | Contact support |
Lifecycle overview
The diagram below shows the standard order lifecycle and the cancellation flow:
                        financialStatus                              fulfilmentStatus
                        ───────────────                              ────────────────

                        PENDING                                      WAITING_FOR_RESOURCES
                           │                                                │
                           ▼                                                ▼
                        AUTHORIZED                                   PREPARED_TO_PRODUCE
                           │                                                │
                           ▼                                                ▼
                         PAID ─────────────────────────────────►     NOT_EDITABLE
                                                                        │           │
                                                                        ▼           ▼
                                                                    FINISHED   CANCELLATION_WAITING
                                                                                    │
                                                                                    ▼
                                                                               CANCELLED


Happy path:   PENDING ──► PAID ──► WAITING_FOR_RESOURCES ──► PREPARED_TO_PRODUCE ──► NOT_EDITABLE ──► FINISHED

Cancellation: ... ──► NOT_EDITABLE ──► CANCELLATION_WAITING ──► CANCELLED
Webhook correlation
Status transitions fire webhook events to subscribed endpoints. See the Webhooks section for setup details.
| Status | Webhook event |
|---|---|
FINISHED | orders/fulfilled |
CANCELLED | orders/cancelled |
| Any status change | orders/updated |
Polling vs. webhooks
While you can poll the Order resource and check financialStatus / fulfilmentStatus, we strongly recommend using webhooks instead. Webhooks deliver status changes in real time, reduce unnecessary API calls, and are not subject to rate limiting that affects high-frequency polling.
Design with CreatorSE
CreatorSE (Creator Server Engine) is a server-side design tool for placing motives on products. Use it when creating ordered products via the usingCreatorSE endpoint on the OrderedProduct resource.
Layout details
By default, CreatorSE places the first motive on the Product Area's hotspot if one is defined. You can override the position and size of a motive using the Position data type.
- To control horizontal position and width: set both
leftandright - To control vertical position and height: set both
topandbottom - Default unit is millimeters; percentage of area width/height is also supported
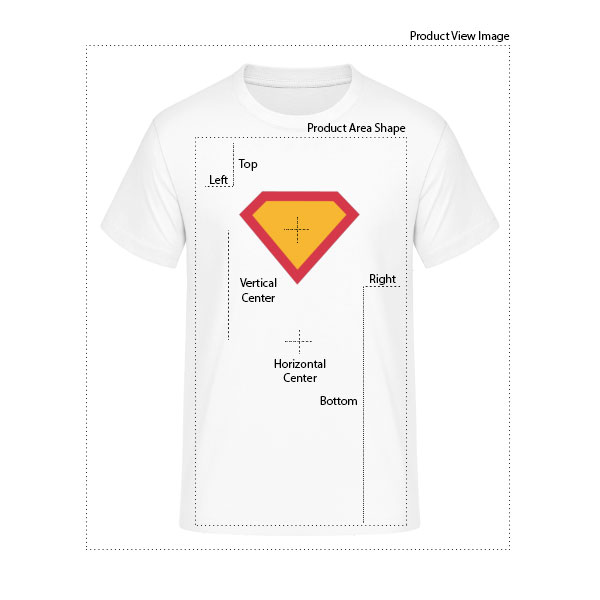
Position example
The following example places a motive with a 10 mm margin on all sides — meaning the motive fills the print area with a 10 mm border on each edge:
{
  "creatorse_element": {
    "motive": {"id": 12345},
    "position": {
      "left": 10,
      "right": 10,
      "top": 10,
      "bottom": 10
    }
  }
}
To position using percentages instead of millimeters, append % to the value (e.g. "left": "10%"). To center the motive on the print area, use "horizontalCenter": 0 and/or "verticalCenter": 0 instead.
Embed the Creator Widget
The Creator widget is Shirtplatform's in-browser product designer. A shop embeds it so end customers can personalise a product — pick colors and sizes, place motives and text — and add the finished design to the basket. The widget renders directly in your page (same DOM, not an iframe) and is driven from your page through a JavaScript API.
Step 1: Fetch the embedding snippet
Call the Creator resource to obtain the snippet. All start-up state (the starting product, colors, callbacks, feature toggles, theme) is passed as query parameters and baked into the returned snippet.
GET /rest/accounts/15/shops/86/creator/snippet?productId=1234&addToBasketCallback=onAddToBasket&creatorStartCallback=onCreatorReady HTTP/1.1
x-auth-token: c4094ac8-fbae-4d67-ab71-7ff0714b7647
Common query parameters (see the resource reference for the full list):
| Parameter | Purpose |
|---|---|
productId | Product loaded when the widget starts |
assignedColorId / assignedSizeId | Color / size selected at start |
amount | Pre-filled quantity |
sharedProductId | UUID of a shared design to load at start |
orderedProductId / editOrderedProductId | Reload an existing ordered product (the edit* form re-opens it for editing and removes it when re-added) |
templateProductId | Design template loaded at start |
creatorDesignMode | SHOP (customer personalisation, default) or TEMPLATE (design-template authoring) |
width / height | Widget content size as a CSS length (percent or pixels) |
addToBasketCallback | Global JS function name called with the persisted ordered-product ids after the customer adds an item |
productChangeCallback / creatorStartCallback | Global JS function names for the product-change and widget-ready events |
Callback parameters name a global JavaScript function. The name must be alphanumeric — a non-alphanumeric name causes a runtime error (error 2155).
Step 2: Embed the snippet
The returned payload contains the HTML to inject and the preloader script URL. The snippet is exactly two things: a mount <div> the widget renders into, and an async <script> that loads the preloader with all start-up parameters packed into it. Inject the HTML into a sized container on your page — the widget sizes itself to the mount element, so give it width and height.
<div id="topLevelSystemManager" style="position:relative;width:100%;height:100%;"></div>
<script async="true" type="text/javascript" src="https://api.shirtplatform.com/creator/rest/accounts/15/shops/86/creator/preloader;data=..."></script>
The mount div id is topLevelSystemManager<widgetId>. With the plain snippet the widget id is empty, so the JavaScript namespace is shirtplatform.creator.api.*. To run several widgets on one page, mount each with a distinct id (e.g. "Main" → div topLevelSystemManagerMain, namespace shirtplatform.creatorMain.api.*).
Step 3: Configure at runtime (optional)
Beyond the query parameters, you can configure the widget client-side before it initializes. Define a global function named creatorApiInitializeCallback; the widget calls it with a configure function you invoke with a config object.
function creatorApiInitializeCallback(configure) {
  configure({
    start:    { productId: 1234, creatorDesignMode: "SHOP" },
    notify:   { addToBasketCallback: "onAddToBasket", creatorStartCallback: "onCreatorReady" },
    features: { enableMotives: true, enableProductChange: true },
    theme:    { backgroundColor: "#ffffff" },
    resourceBundleOverrides: [ { bundleName: "creator", overrides: [ { key: "...", value: "..." } ] } ]
  });
}
The config object has five sections: start (starting product/design state), notify (callback function names), features (feature toggles), theme (colors), and resourceBundleOverrides (i18n string overrides).
Step 4: Drive the widget through its JavaScript API
Once the widget fires creatorStartCallback, the API object is available at shirtplatform.creator<widgetId>.api.<Class>. The main classes:
| Class | Purpose | Key methods |
|---|---|---|
Creator |
Load products and designs, open categories, set price/label options | loadProduct(productId, assignedColorId), loadSharedProduct(uuid), loadDesignedOrderedProduct(orderedProductId, uuid), loadDesignedProduct(base64Design), setDefaultProduct(...), openProductCategory(id), configure(config) |
CurrentDesign |
Manipulate the design in view and trigger the order | changeProduct(productId, assignedColorId), changeAmount(assignedSizeId, amount), addToBasket(assignedSizeId, amount), addMotive(id), addTextMotive(text, fontId), getTotalPrice(), setAddToBasketCallback(fn) |
DesignedSharedProduct |
Save the current design as a shareable product | saveCurrentDesign(resultFn, faultFn), setSharedDesignUrl(url) |
DesignedTemplateProduct |
Author and store design templates (in TEMPLATE mode) |
saveCurrentDesign(...), storeCurrentDesign(...), overrideSellingPriceValue(price), enableAssignedColor(id) |
Discounts |
Apply quantity-based discount rules in the widget's price display | setQuantityRules(map), setExclusionList(skus), setCurrentBasketQuantity(n), setMaxDiscount(n) |
Step 5: Receive the ordered items
When the customer adds a design, the widget builds the ordered products, persists them, and calls your addToBasketCallback with the resulting ids. Reference those ids in your shop's basket / checkout.
function onCreatorReady() {
  // API is now usable, e.g. shirtplatform.creator.api.Creator.loadProduct(1234);
}

function onAddToBasket(orderedItemIds, orderedItems) {
  // orderedItemIds: the persisted ordered-product ids to add to your basket
}
Other events the widget fires to host-page global functions: productChangeCallback(productId), priceChangeCallback(price), designChangeCallback(designedProducts), and creatorFullScreenToggleCallback(state). There is no postMessage bus — the widget communicates purely through these named global callbacks and the shirtplatform.creator*.api object.
Product Catalog Guide
Overview
A Product is a configurable item template (e.g. "Gildan 5000 T-shirt"). It defines available colors, sizes, views (front/back), and print areas. Products belong to a Shop and are always accessed under the accountId + shopId path.
When placing an order, you reference the product's assignedColor.id and assignedSize.id — not the raw color or size IDs. These assigned IDs come from the product's own configuration and are specific to that product.
Step 1 — List products
Use a GET request to the Product resource to browse the catalog. The endpoint supports pagination via page and size query parameters:
GET /webservices/rest/accounts/15/shops/86/products?page=0&size=10 HTTP/1.1
Accept: application/json
x-auth-token: c4094ac8-fbae-4d67-ab71-7ff0714b7647
The response contains a paged list (PagedData) with a product array. Atom atom.link entries provide navigation to the next and previous pages.
Step 2 — Get product detail (expanded)
Use GET .../products/expanded/{productId} to retrieve the product with all sub-resources inlined. This is the preferred call when you need to pick a color and size for an order, because it returns colors, sizes, SKUs, print areas, prices, and localizations in a single response:
GET /webservices/rest/accounts/15/shops/86/products/expanded/41559 HTTP/1.1
Accept: application/json
x-auth-token: c4094ac8-fbae-4d67-ab71-7ff0714b7647
The response contains a product object with nested assignedColors, assignedSizes, and productSkus collections, among other sub-resources.
Step 3 — Identify SKU for an order
A ProductSku represents the intersection of an assignedColor and an assignedSize for a product. Each SKU has a stockId — the ID of the underlying stock item (the physical blank). Here is what a typical SKU looks like in the expanded product response:
{
  "productSku": {
    "id": 98701,
    "stockId": 4201,
    "available": true,
    "assignedColor": {"id": 227227},
    "assignedSize": {"id": 133414}
  }
}
When using CreatorSE to place an order, you need productId, assignedColor.id, and assignedSize.id from the expanded product response. See the How to Make an Order guide for the full ordering workflow.
Shop Motive Catalog
The shop motive catalog is the collection of artwork managed by the integrator for a given shop. Motives in this catalog are displayed in the Creator tool so that customers can pick a design, and they are referenced by ID when placing orders via CreatorSE. Each motive belongs to a Shop, has a type, and can be enriched with print technology constraints, localizations, tags, and categories.
For integrator-uploaded bitmap artwork the type is HIGH_RESOLUTION_BITMAP. This is distinct from the User Motive Library, which is a private per-customer artwork store — see the comparison at the end of this section.
Step 1 — Create the motive record
Make a POST request to the Motive resource with a minimal MotivePrime body containing the name and type. The response contains the new motive's id.
POST /webservices/rest/accounts/15/shops/86/motives HTTP/1.1
Accept: application/json
Content-Type: application/json
x-auth-token: c4094ac8-fbae-4d67-ab71-7ff0714b7647

{"motive": {"name": "My design", "type": "HIGH_RESOLUTION_BITMAP"}}
Step 2 — Upload the bitmap image
Make a POST request to .../motives/{motiveId}/bitmap as multipart/form-data with the image file attached. Supported formats: JPEG, PNG.
curl -X POST \
  "https://pilot.shirtplatform.com/webservices/rest/accounts/15/shops/86/motives/67890/bitmap" \
  -H "x-auth-token: c4094ac8-fbae-4d67-ab71-7ff0714b7647" \
  -F "file=@/path/to/design.png"
Step 3 — Assign a print technology
Make a POST request to .../motives/{motiveId}/technologies with a MotivePrintTechnologyPrime body referencing the print technology ID. The print technology ID comes from the product's assigned print technology configuration — use the same technology that the target product expects.
POST /webservices/rest/accounts/15/shops/86/motives/67890/technologies HTTP/1.1
Accept: application/json
Content-Type: application/json
x-auth-token: c4094ac8-fbae-4d67-ab71-7ff0714b7647

{
  "motivePrintTechnology": {
    "printTechnology": {"id": 3}
  }
}
Step 4 — Use the motive in an order
The motive is now ready to be referenced in a CreatorSE order by its id. See the Design with CreatorSE guide for full layout details.
{
  "creatorse_element": {
    "motive": {"id": 67890}
  }
}
Additional management endpoints
GET .../motives— list all motives in the shop (paginated)GET .../motives/{motiveId}— get motive detailPUT .../motives/{motiveId}— update motive name or typeDELETE .../motives/{motiveId}— delete motive{motiveId}/localizations— manage translated name/description{motiveId}/tags/{tagId}(PUT) — assign a tag{motiveId}/assignedCategories(POST) — assign a category
Shop Motive Catalog vs. User Motive Library
| Shop Motive Catalog | User Motive Library | |
|---|---|---|
| Managed by | Integrator / shop operator | End customer |
| Scope | Shared across all customers in the shop | Private per customer session or account |
| Visible in Creator | Yes — customers browse and pick from this catalog | Yes — customers see their own uploaded artwork |
| API resource | Motive | UserMotive |
| Lifetime | Permanent — until explicitly deleted | Session (default) or permanent (with Customer Key) |
User Motive Library
The User Motive Library is a private artwork store for each end customer. Customers upload their own images here and reuse them across their orders. This is distinct from the Shop Motive Catalog, which is managed by the integrator and shared across all customers in the shop.
There are two library types:
| Type | Lifetime | Access |
|---|---|---|
| Session library | Until x-auth-token expires |
Default — no extra setup required |
| Permanent library | Indefinite | Requires a Customer Key at login |
Using the permanent library
- Obtain a Customer Key by making a
GET uuidrequest to the public Nonce resource (no authentication required). - Log in with a
POSTto the Authentication resource, passing your Customer Key in thex-customer-keyrequest header. Using the same key always grants access to the same permanent library.
Uploading a motive
- HTML / form-based clients: use the
createFromMultipartFormPOST method on the UserMotive resource - API clients: use the
createFromDataPOST method, providing an image URL or base64-encoded file content
The returned MotivePrime contains the motive id, which is then used in CreatorSE orders exactly like any catalog motive.
Filters
Shirtplatform uses a stored filter system for querying list endpoints. Instead of passing filter criteria as query string parameters, you first create a filter object on the server and then reference it by its filterId on any paginated endpoint. This two-step approach lets you build complex queries with multiple conditions, nested sub-filters, and sort orders — all reusable across requests.
Top-level filter types
These filter types are used directly as the filterId target on paginated list endpoints. Use the root element name as the JSON root key when creating the filter.
| Filter root element | Data type | Example endpoint |
|---|---|---|
productFilter | Filter.Product | GET /accounts/{accountId}/shops/{shopId}/products |
productionOrderFilter | Filter.Order | GET /accounts/{accountId}/shops/{shopId}/orders |
motiveFilter | Filter.Motive | GET /accounts/{accountId}/shops/{shopId}/creator/motives |
sharedProductFilter | Filter.SharedProduct | GET /accounts/{accountId}/shops/{shopId}/sharedProducts |
orderedProductFilter | Filter.OrderedProduct | GET /accounts/{accountId}/shops/{shopId}/orders/{orderId}/orderedProducts |
orderedProductCustomAttributeFilter | Filter.OrderedProductCustomAttribute | GET /accounts/{accountId}/shops/{shopId}/orders/{orderId}/orderedProducts/{productId}/customAttributes |
shopFilter | Filter.Shop | GET /accounts/{accountId}/shops |
webhookFilter | Filter.Webhook | GET /accounts/{accountId}/shops/{shopId}/webhooks |
countryFilter | Filter.Country | GET /accounts/{accountId}/countries |
productionOrderCsvImportFilter | Filter.OrderCsvImport | GET /accounts/{accountId}/shops/{shopId}/orderCsvImport |
Sub-entity filter types
These filter types are used as nested sub-filters inside top-level filters (e.g. productLocalizedFilter inside productFilter). They cannot be used directly as a filterId on endpoints.
| Filter root element | Data type | Description |
|---|---|---|
productLocalizedFilter | Filter.ProductLocalized | Localized product attributes (e.g. translated name) |
productAssignedToCategoryFilter | Filter.ProductAssignedToCategory | Product-to-category assignments |
productSkuFilter | Filter.ProductSku | Product SKU entries |
productColorFilter | Filter.ProductColor | Product color definitions |
productSizeFilter | Filter.ProductSize | Product size definitions |
productViewFilter | Filter.ProductView | Printable view definitions of a product |
productPriceFilter | Filter.ProductPrice | Product price entries (by country, color, size) |
assignedProductColorFilter | Filter.ProductAssignedColor | Color variants assigned to a product |
assignedProductSizeFilter | Filter.ProductAssignedSize | Size variants assigned to a product |
assignedProductViewFilter | Filter.ProductAssignedView | Printable view assignments to a product |
productViewColorDetailFilter | Filter.ProductAssignedViewColor | Color assignments per product view |
assignedProductStickerFilter | Filter.ProductAssignedSticker | Sticker assignments to product views |
assignedPrintTechnologyFilter | Filter.ProductAssignedPrintTechnology | Print technology assignments to products |
assignedAttributeListItemFilter | Filter.ProductAssignedAttributeListItem | Attribute list item assignments to products |
motiveLocalizedFilter | Filter.MotiveLocalized | Localized motive attributes (e.g. translated name) |
motiveAssignedToCategoryFilter | Filter.MotiveAssignedToCategory | Motive-to-category assignments |
motivePrintTechnologyFilter | Filter.MotivePrintTechnology | Print technology assignments to motives |
tagFilter | Filter.Tag | Tag resources |
shopPropertyFilter | Filter.ShopProperty | Shop configuration property entries |
Step 1: Create a filter
Send a POST request to /rest/filters with a JSON body describing your filter criteria. The root element name determines which entity the filter targets (e.g., productFilter, productionOrderFilter, motiveFilter). The response includes a filterId that you can use in subsequent requests.
POST /rest/filters HTTP/1.1
Content-Type: application/json
x-auth-token: c4094ac8-fbae-4d67-ab71-7ff0714b7647{
"productFilter": {
"expressionSimple": {
"value": "false",
"op": "=",
"property": "deleted"
},
"order": {
"direction": "asc",
"property": "name"
}
}
}{
"productFilter": {
"filterId": "42",
"expressionSimple": {
"value": "false",
"op": "=",
"property": "deleted"
},
"order": {
"direction": "asc",
"property": "name"
}
}
}If an identical filter already exists for your user (matched by content digest), the existing filter is returned instead of creating a duplicate.
Expression types
The criteria list in a filter body accepts six expression types. All expressions within the same filter are combined with AND logic by default.
| Type | XML element name | Fields | Purpose |
|---|---|---|---|
| Simple | expressionSimple |
property, op, value |
Compare a single property against a value using an operator (=, !=, like, etc.) |
| Between | betweenExpression |
property, minValue, maxValue |
Match values within an inclusive range (dates, numbers) |
| Contain (IN) | expressionContain |
property, negation, list |
Match a property against a list of values (SQL IN / NOT IN) |
| Is Null | expressionIsNull |
property |
Match records where the property value is null |
| Disjunction (OR) | expressionDisjunction |
expressions (nested list) |
Combine nested expressions with OR logic |
| Conjunction (AND) | expressionConjuction |
expressions (nested list) |
Explicitly combine nested expressions with AND logic |
Operators for expressionSimple
| Operator | Description | Example value |
|---|---|---|
= | Equal | "value": "false", "op": "=", "property": "deleted" |
!= | Not equal | "value": "CANCELLED", "op": "!=", "property": "status" |
like | Pattern match (case-sensitive, use % as wildcard) | "value": "%shirt%", "op": "like", "property": "name" |
ilike | Pattern match (case-insensitive) | "value": "%shirt%", "op": "ilike", "property": "name" |
< | Less than | "value": "100", "op": "<", "property": "id" |
> | Greater than | "value": "100", "op": ">", "property": "id" |
<= | Less than or equal | "value": "50", "op": "<=", "property": "price" |
>= | Greater than or equal | "value": "10", "op": ">=", "property": "price" |
All values are strings. The server automatically converts them to the target field's Java type (Boolean, Integer, Date, Enum, etc.).
Note on date format: Date values in filter expressions must use yyyy/MM/dd HH:mm:ss (24-hour clock). This is different from the ISO 8601 format used in API responses — do not use the response timestamp format directly in filter values.
Advanced examples
Date range with betweenExpression — filter orders created in Q1 2026. Date format is yyyy/MM/dd HH:mm:ss.
{
  "productionOrderFilter": {
    "betweenExpression": {
      "property": "createdDate",
      "minValue": "2026/01/01 00:00:00",
      "maxValue": "2026/03/31 23:59:59"
    }
  }
}
IN-list with expressionContain — fetch specific products by ID.
{
  "productFilter": {
    "expressionContain": {
      "property": "id",
      "negation": false,
      "list": {
        "String": ["101", "102", "103"]
      }
    }
  }
}
Nested sub-filter — search products by localized name. The productLocalizedFilter joins the localized data and applies a case-insensitive pattern match.
{
  "productFilter": {
    "expressionSimple": {
      "value": "false",
      "op": "=",
      "property": "deleted"
    },
    "productLocalizedFilter": {
      "expressionSimple": {
        "value": "%shirt%",
        "op": "ilike",
        "property": "name"
      }
    }
  }
}
OR logic with expressionDisjunction — match motives of type BITMAP or VECTOR.
{
  "motiveFilter": {
    "expressionDisjunction": {
      "expressionSimple": [
        { "value": "BITMAP", "op": "=", "property": "type" },
        { "value": "VECTOR", "op": "=", "property": "type" }
      ]
    }
  }
}
Step 2: Use the filter
Pass the filterId as a query parameter to any paginated list endpoint. The server loads the stored filter and applies it to the query.
GET /rest/accounts/15/shops/86/products?filterId=42&page=0&size=20 HTTP/1.1
x-auth-token: c4094ac8-fbae-4d67-ab71-7ff0714b7647
Error handling
| Scenario | Behavior |
|---|---|
filterId is empty or not provided | The endpoint uses its own default filter (typically deleted = false with default ordering) |
filterId is provided but does not exist | Error code -104 FilterNotFoundException |
| Invalid property name in a filter expression | SqlValidationException at query execution time |
Webhooks
Webhook subscriptions let your app receive notifications when specific events occur in your shops — without polling. For example, your app can react immediately when a customer places an order or when Shirtplatform fulfills an order.
Supported events
| Domain | Topic | Payload type |
|---|---|---|
| Order | orders/updated | ProductionOrderExpanded |
orders/readyForProduction | ProductionOrderExpanded | |
orders/fulfilled | ProductionOrderExpanded | |
orders/acknowledged | ProductionOrderExpanded | |
orders/failed | ProductionOrderProcessingError | |
orders/splitted | ProductionOrderSplitted | |
orders/cancelled | ProductionOrderExpanded |
Webhook anatomy
Each notification is an HTTP POST to your endpoint URL with a JSON or XML payload and context headers:
x-shirtplatform-topic: orders/updated
x-shirtplatform-hmac-sha256: XWmrwMey6OsLMeiZKwP4FppHH3cmAiiJJAweH5Jo4bM=
Payload example
The request body is a JSON (or XML) representation of the event's payload type. Below is an abbreviated example for orders/fulfilled:
{
  "productionOrderExpanded": {
    "id": 177,
    "uniqueId": "SHOP-ORDER-001",
    "created": "2024-06-01T10:23:00+02:00",
    "financialStatus": "PAID",
    "fulfilmentStatus": "FULFILLED",
    "customer": {
      "firstName": "John",
      "lastName": "Doe",
      "email": "john.doe@example-shop.com"
    },
    "orderedProducts": {
      "designedOrderedProduct": [
        {
          "id": 5512,
          "amount": 2,
          "atom.link": [
            { "@rel": "self", "@href": "https://api.shirtplatform.com/webservices/rest/accounts/15/shops/86/orders/177/orderedProducts/5512" }
          ]
        }
      ]
    },
    "fulfillments": {
      "orderFulfillmentExpanded": [
        {
          "id": 88,
          "trackingNumber": "TRACK123456",
          "trackingUrl": "https://carrier.example.com/track?nr=TRACK123456"
        }
      ]
    },
    "atom.link": [
      { "@rel": "self", "@href": "https://api.shirtplatform.com/webservices/rest/accounts/15/shops/86/orders/177" }
    ]
  }
}
Configuring a webhook
Send a POST request to the Webhook resource with your endpoint URL and the events you want to subscribe to.
Responding to webhooks
Your endpoint must return 200 OK. Any other response (including 3xx redirects) is treated as a failure. Shirtplatform retries every 60 minutes for up to 48 hours.
Verifying webhooks
Each request includes an x-shirtplatform-hmac-sha256 header. Compute the HMAC-SHA256 of the request body using your webhook secret and compare it to the header value:
private String computeHmacSignature(String secret, byte[] requestBody) throws Exception {
    final Mac sha256Hmac = Mac.getInstance("HmacSHA256");
    String authToken = DigestUtils.sha256Hex(secret);
    final SecretKeySpec secretKey = new SecretKeySpec(authToken.getBytes(StandardCharsets.UTF_8), "HmacSHA256");
    sha256Hmac.init(secretKey);
    return Base64.encodeBase64String(sha256Hmac.doFinal(requestBody)).trim();
}
CSV Import
You can upload a CSV file containing multiple orders for batch processing via the OrderCsvImport resource.
File format
- Default: European CSV/DSV — decimal separator
,, value separator; - USA/UK format: decimal separator
., value separator,— set theseparator(and optionallyquote) query parameter - Encoding: UTF-8 by default; BOM header is recognized; other encodings can be specified — see Java encoding docs
An example European CSV file can be downloaded here.
Column reference
Columns must appear in this exact order. All 54 columns are required as headers; unused fields may be left empty.
| # | Column name | Description |
|---|---|---|
| Order | ||
| 1 | order group id | Groups rows into the same order. Rows with the same value become items in one order. |
| 2 | uniqueId | Your external order identifier. |
| 3 | countryId | Shirtplatform country ID (determines currency and VAT). |
| Shipping | ||
| 4 | shipping carrier Id | Shirtplatform carrier ID. |
| 5 | orderShippingCode | Shipping method code. |
| 6 | orderShippingTitle | Shipping method display title. |
| 7 | orderShippingPrice | Shipping price. |
| 8 | orderShippingCodPrice | Cash-on-delivery surcharge. |
| 9 | orderShippingOrderValue | Order value used for shipping cost calculation. |
| Customer | ||
| 10 | customer first name | |
| 11 | customer last name | |
| 12 | customer email | |
| 13 | customer phone | |
| Billing address | ||
| 14 | customer billing address first name | |
| 15 | customer billing address last name | |
| 16 | customer billing address name | Company name. |
| 17 | customer billing address street | |
| 18 | customer billing address street no | |
| 19 | customer billing address city | |
| 20 | customer billing address country name | |
| 21 | customer billing address country code | ISO 3166-1 alpha-2 (e.g. DE). |
| 22 | customer billing address zip | |
| 23 | customer billing address state name | |
| 24 | customer billing address state code | |
| 25 | customer billing address phone | |
| 26 | customer billing address email | |
| Shipping address | ||
| 27 | customer shipping address first name | |
| 28 | customer shipping address last name | |
| 29 | customer shipping address name | Company name. |
| 30 | customer shipping address street | |
| 31 | customer shipping address street no | |
| 32 | customer shipping address city | |
| 33 | customer shipping address country name | |
| 34 | customer shipping address country code | ISO 3166-1 alpha-2 (e.g. DE). |
| 35 | customer shipping address zip | |
| 36 | customer shipping address state name | |
| 37 | customer shipping address state code | |
| 38 | customer shipping address phone | |
| 39 | customer shipping address email | |
| Design | ||
| 40 | design group id | Groups rows into the same design (multiple motives, different sides). |
| 41 | design product id | Shirtplatform product ID. |
| 42 | design product sku | Product SKU (alternative to product ID). |
| 43 | design amount | Quantity. |
| 44 | composition group id | Groups rows into the same composition (multiple motives on the same area). |
| 45 | product area id | Shirtplatform product area ID. |
| 46 | product area name | Product area name (alternative to area ID). |
| 47 | element motive id | Shirtplatform motive ID. |
| 48 | element motive url | URL of a bitmap motive to upload on-the-fly. |
| Motive position | ||
| 49 | position left | Distance from left edge of print area (mm or %). |
| 50 | position right | Distance from right edge of print area (mm or %). |
| 51 | position top | Distance from top edge of print area (mm or %). |
| 52 | position bottom | Distance from bottom edge of print area (mm or %). |
| 53 | position horizontal center | Center horizontally on the print area (true/false). |
| 54 | position vertical center | Center vertically on the print area (true/false). |
Group ID fields
Most fields correspond to the ProductionOrderDeferred data type. Three special fields control how rows are grouped into orders and designs:
| Field | Purpose |
|---|---|
order group id |
Rows with the same value are imported as items in the same order |
design group id |
Rows with the same value are imported as composition items in the same design (multiple motives, different sides/areas) |
composition group id |
Rows with the same value are imported as element items in the same composition (multiple motives on the same side/area) |